Search

Learn HTML(5)

From Aryia Cassandra

Blog 3

Dear All,

I appreciate those who read this, although I do notice that the website name is not very relevant to the website… This includes a lot of money with buying a domain name and a hosting site, upgrading the wordpress, etc, and I am just not sure if that would be worth it right now or if it’s the best idea… What do you think?

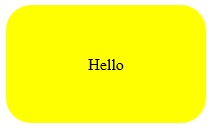
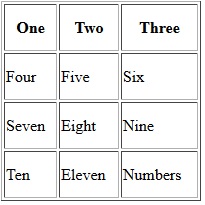
I don’t know if by upgrading or hosting I would be able to change the layout to 3 small boxes in order looking neat starting from lessons one and down the page to each new subject with “Read More..” A little like this:

untitled

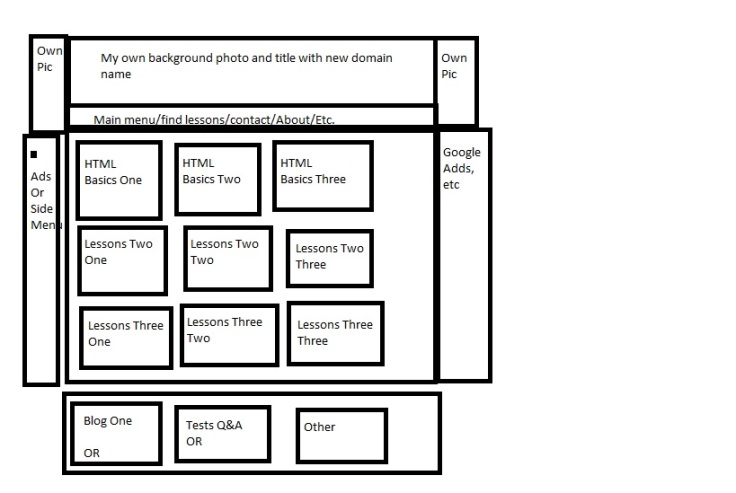
So you see what I mean by in the end it’s looking smart and in order and the boxes will all be the same size instead of running all down the page with only the latest p date at the top of the page…. I may do more lines such as blogs, 1,2,3 or test bits 1,2,3 or another idea which I have not had yet…But the idea is there, I just need to figure out how to do it, and am unsure if I HAVE to spend a lot of money in order for this (This could be a great website) because I have been all over WordPress and there are just no options at all to do this with layout, and yes I know a fair bit of JavaScript but not so much as to do this yet…

(Of course google adds and links to things will help bring in SOME money if not a lot..) But these would be links to things that are actually useful and helpful!

….

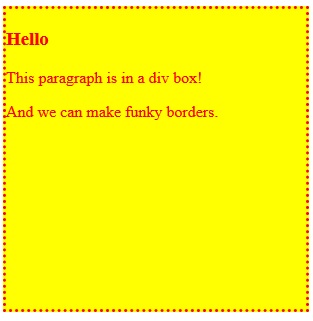
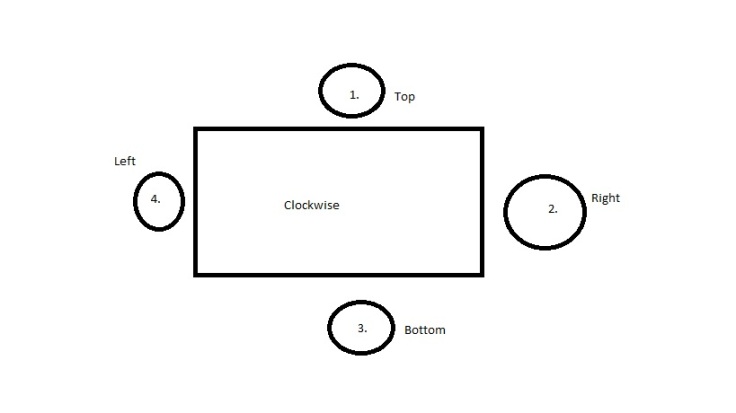
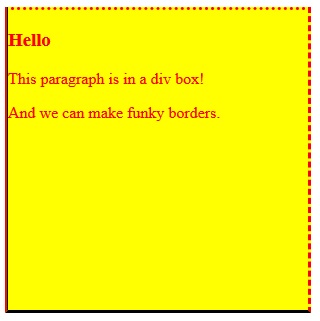
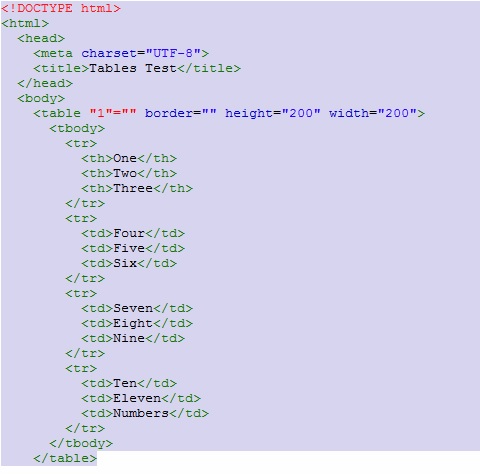
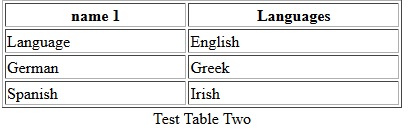
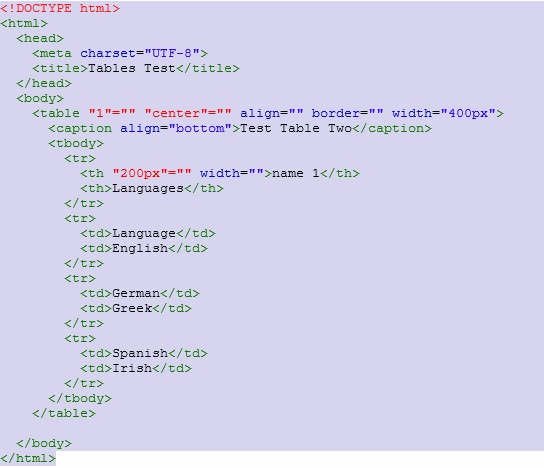
Aside from that (which I suppose you are not very interested in, I am not offended!) I have not updated any lessons for such a long time becase regardless of being CONSTANTLY busy (I will keep my personal life to myself..) But I have a lot on my hands right now, but Despite that the next lesson I wanted to give is about creating many div boxes and floating them accross the page using float and padding and margins and such… Showing how to spread them accross the page if yo were making different articles on your webpage or whatever and even doing flip div’s, which is fun. (Good for questions and answers lol.) But I just find that I have all my notes yet I cannot find the best way to describe it or write it properly so it is super simple. I feel like I have gone into the deep end where I was last telling you how to write headings in colors and size and the next minute I want you to do a flip div with no confusion! I feel as if I have left some major bits out, but no worries all. “Where they is a will, there is a way.” So they say.

If anybody has tested out my coding and found problems, please don’t hesitate to let me know (I DO try to make it picture perfect!) If one of you would like to learn something in particular about subjects gone through or something else that I have not gone trough, please comment and let me know. Everything matters from you guys!!

From Aryia x x x x x

Ps. If you enjoy and love this sort of thing and would like to work with it in your life then don’t give up on your dream. I know that it is a very difficult business to get into as there is so much competition. (Or, well, that is what people will tell you.) If you are in highschool and using this just for fun then you could go on and do IT or specific UNI/College courses in these specific subjects. But to be honest, a lot of web developer or web designer jobs require that you know how to use certain programs, have a good knowledge of computers and internet, have a good eye for design. You may have to accept that you need a normal job to pay the rent and live, and in your spare time you study and keep towards your dream, and this may take a short while or many years… It’s all up to you, it was just a comment, thank you for reading.

Aryia Cassandra.

Lessons Three – (2)

Div Boxes and Border Styles


There are a lot more styles that we can apply to borders, but this time let’s make a div box. Div’s are used all the time in HTML pages and it is considered the best way to build a webpage now: Instead of tables, use div’s and floats…

A div is pretty much a box with content in it. For instance, on a web page you may have a paragraph in one div and in another div you will have an article, and you can then move the paragraphs and articles to where you would like on your page (using float) and do things such as this…

divbox
It’s quite a simple example. Let’s go through it slowly… Here is the code:

HTML:

<!DOCTYPE html>
<html>
<head>
<meta content=”text/html; charset=UTF-8″ http-equiv=”content-type”>
<title></title>
<link rel=”stylesheet” type=”text/css” href=”css.css”>
</head>
<body>


Hello


This paragraph is in a div box!


And we can make funky borders.


</body>
</html>

CSS:

#box

{width: 300px; height: 300px; border-style:dotted; color:red; background-color:yellow;}


Firstly, as you notice, I have my HTML page linked up to my CSS page (which I have simply called css.css…exiting I know.)

In the HTML, the important parts are the div starts and endings.You have to give the div and id (or class) in order to change what it looks like…

tells the CSS sheet that anything within the curly braces of #box will be applied to this div box.

Go ahead and write what you would like to inside your div, and then end it off with simply

Now you start with the CSS… First you have to decide how large or small you want your box to be (width and height) and you need to be able to see that it is in a box.. That’s why we have added a border, in this case dotted) and the colors and background colors were just for fun.

Try creating the same box on your own. You could make the boxes different sizes by changing the pixels…You can change the colors and now here, you can change the border style to many different styles:

– Dotted
– Solid Black
– Dashed
– Double
– Groove
– Ridge
– Inset
– Outset
– Hidden
– None
…and more.

You don’t have to have the same border style all around the box. If you wanted the top and bottom of the border to be solid black and you wanted the two sides to be dotted, you can do that.

It is important to know that a div box will always go clockwise… Like this:

example

So if I do this…

#box {width: 300px; height: 300px; border-top:dotted;border-right:dashed;border-bottom:solid black; border-left:ridge; color:red; background-color:yellow;}

Then we will see this result:

dashed

There is a lot more that you can do with div’s. Of course you can have multiple div boxes but you would probably like to separate them a bit, which we will look at in the next lesson. (padding and margin.)

You can make your box have rounded corners simply by using the “border-radius:”.

Simple HTML…

Hello

CSS is a bit different…

.rounded_box  {background-color:yellow; width:200px; text-align:center;padding:50px 0px; border-radius: 25px;}

corners

Cool, right?

That’s enough for today. Great job!

Lessons Three – (1)

Tables.

Of course we are not going to dive into CSS yet (only a tad) – This website is about HTML(5) remember!

One thing that is a great place to start is by using tables. Tables can (and used to) be used to create a web page layout, although it is not recommended anymore – They say use tables only for making small graphs or tables for your web page but to actually layout the page, use div’s and floats, and more…

To start off with you need to remember that <table> and </table> are to start and end your table (attributes can be added to this element.) <th>Text</th> This is your table heading (which can also have attributes added). Before you type your heading, you need to put them into a table row <tr>, so open up your <table> and your <tr>, then you can make your table headings, so you can have have as many table headings, but in this tutorial we are going to just use two. So:

<body>
<table>
<th>Title one</th>
<th>Title two</th>
</tr>
<tr>

– Open a new table row, and this is where you will have your columns. That’s <td></td>

<body>
<table>
<th>Title one</th>
<th>Title two</th>
</tr>
<tr>
<td>Text</td>
<td>Text two</td>
</tr>
<tr>
<td>Text three</td>
<td>Text four</td>
</tr>
</table>
</body>

Alright, see what happened there? We typed in row – in row put two headings then close row and open new row, add two columns, close columns, close row, open last row and add two columns (close them) close row and close table…  Perhaps that looks or sounds quite confusing still, well, like I said the table element and the table heading elements can both have attributes, so let’s add some style to your table:

<body>
<table border “1” width=”400px” align “center”>
<caption align=”bottom”>Test Table</caption>
<tr>
<th width “200px”>Title One</th>

Now see your result! (Make sure all the code is correct.)

– Table border obviously puts a border around the table so it outlines it to see t more clearly. The size of the table is measured in pixels, in this case 400px, and the align center is is also self explanatory  (align right, left, bottom, top..)

– The caption is just a nice neat little caption that is set to be at the “bottom” of the table saying Test Table one.

– Both table headings are set to 200px.

Now your assignment is to create this:

tableone

——————————————————-

Great! Now that you have an idea, we are going to be making two other tables.. I will tell you the code but first I want you to take a look at the table and try your best to recreate it yourself first.

1. Table.

tablethree

2. Code.

threecode

1. Table

tabletwo

2. Code

twocode

Wonderful! So you can see now how tables are so useful on websites that need them and they are not all that complected to make. Although there is still an ongoing debate about using tables as web page layouts, you can easily make an HTML/CSS web page like this using a table:

sitetest

This was actually my second try at a HTML/CSS code only homepage (with all the links working). I knew a little more about the programs then what we are at right now but in no time you will easily do the same thing or better. (Oh, just a warning: That getting the photos to line up center with menu to side was a real pain, getting the % right is an important thing to do. (100% whole page, 20% each side, rest of space middle/or even a table with % top or bottom.)

Your activity today:

Mess around with the CSS of the table, like:

table {border:1px solid black; border-collapse:collapse;}
th, td {border:1px solid black; padding:5px;}
thread {background-color:#CCDDEE;}
tfoot {background-color:ddccee; text-align:center;}

Even if it doesn’t make sense now, still try to find out what difference it makes and what you can do. More on this subject later!

Lessons Two – (Ending)

Introduction:
(Yay, now we are knowledgeable in basic HTML(5) and should be able to make a basic web page using everything that you have learnt so far. But it’s time that we move on to more HTML(5) and include CSS(3), to really make your page a lot more stylish! (Luckily you already have an idea of CSS colors and fonts and classes, plus getting a bit nerdy with info…  Here we go!)

CSS Basics

CSS stands for Cascading Style Sheet.

There are three ways of using CSS in your HTML page:

Inline: Using a <style> attribute in the HTML elements.

Internal: Using a <style></style> element in the <head> section of the page.

External: Linking a CSS page to your HTML page and doing all the CSS on there.

(I do not suggest using inline CSS simply because it is a lot more amateur, harder to read and more work. 

I also do not suggest using the Style in the head section of the HTML page because you may have a lot of CSS on your page and this will simply clog up, look messy, and be too much information to go through in one page..

External Style Sheet is (almost always) the best option to go go for. Here you can write all of your styles and as many/much you would like and be able to control the HTML styles simply on one page. External style sheets are linked to the HTML page, so that they have an effect on the result…)


There are also 3 parts to CSS – The first is the “selector” example: <body>, this could be the part of the document which is effected by the rule. Then the “property” example: “background-color” is the part that specifies what part of the layout is being set to, and then the “value” example: “#d8da3d” that gives the value of that style property…


I think we have already gone over this, but to add an external style style sheet to your HTML page, you need to link it up. To do this first open up a new page, write some text and and save it in the same folder as your HTML file. Save it as (whatever name you want) so:

Save As – MyStyle.css – select “All files”.

Then go back onto your HTML page and link it up:

<link rel=”stylesheet” type=”text/css” href=”MyStyle.css”>

(Put this in the <head> section of your page.)


Now, test it out with what you have already learned…

Your assignment is to write a normal HTML page with headers and paragraphs but change certain words or sentances different fonts or different colors by using CSS on your External Style Sheet. (Remember you will have to save both and then open up web page on browser on HTML page to see results.)  Good luck!

(You may go back to read the lesson again.)

HTML(5) Part 7 – Basics – Lists.


Lessons 2 – (4)


URL – Uniform Resource Locator.

Being a web developer in this day and age will have to work with URLs at some point, and it’s the sort of knowledge that should be known by developers and users alike. (In fact as a web developer it will be pretty much impossible not to work with URLs and there really is no excuse as they are very easy and there isn’t much to it!)

A URL is another word for a web address. It can be composed or words (www.google.com) or an internet protocol (Also called an IP address – these are all numbers.)

A URL is pretty easy, right? I mean it starts with “http” and ends with “.com”. (or .org or .ca..etc) But there are actually nine parts to a URL. (This is the URL Syntax.)

A URL can have a very small code, like: “http://www.google.co.uk/.site&#8221;
(In technical terms this would mean: “scheme://prefix.domain:port/path/filename.”)

…Or it can look more like this… “https://www.google.lu/?gws_rd=cr,ssl&ei=57KdV7XWMarE6ASfmL6IAw#q=web+server+and+database+difference&#8221;


So here are all parts explained, called URL Syntax:

Scheme – A scheme defines the type of internet service that you are using. (The most common is http)

The Prefix  is the default for that service, with http the prefix would be www.

The Domain Name is your website address, such as google’s domain name can be http://www.google.co.uk or you can have http://www.coolwebsitehere.com&#8230;

Port – A port defines the “port” number to the host… There are 0 to 65535 port numbers used for different servers, but http’s most used and default port is 80. (A bit confusing, I know.)

Path – A path is the path of one page of the webpage which can change paths to other pages or there will be a path in acting as the computer says it cannot access computer page. (If omitted.)

A filename is basically what it says, it is the name of a document or recourse.

Or you could come accross URL’s with usernames and passwords. (These come up fairly often as two first parts of the URL.

Perimeters.. Those are when you see a big long crazy list of numbers and letters, they appear after the Path and are separated by characters such as / . =  +, etc.

Query: This is the preferred way to send some parameters to a resource on the server. These are “key-value” pairs and are separated from the rest of the URL by a question mark (?) or are normally separated from each other by & (ampersand) character. It is also legal to use a semi colon: (;)


What about those ASCII characters I was on about? Well…

Characters that have special meaning within a URL are known as “reserved characters”. That means that they are more meaningful, if a query chatacter is being used in a URL that shouldn’t be then it will excaped before being included in a URL, or they can separate components from each other.

";" | "/" | "?" | ":" | "@" | "&" | "=" | "+" | "$" | ","

Or there are unreserved characters… They can be included in a URL and are not escaped but are not highly recommended as some browsers will not accept them in a URL.

"-" | "_" | "." | "!" | "~" | "*" | "'" | "(" | ")"

Unwise characters are at your own risk to use, so I recommend not using at all in a URL simply because it may lead to a page that you cannot escape..

"{" | "}" | "|" | "\" | "^" | "[" | "]" | "`"

… and this last set of characters are called an excluded character set because they are not accepted by ASCII:

“<” | “>” | “#” | “%” | ‘”‘


Oh, yeah, and Scheme can often be misunderstood:

– HTML (Hyper Text Transfer Protocol) is not encrypted and is commonly used on most webpages.

– HTTPS (Secure Hyper Text Protocol) is encrypted and is used for secure webpages.

– FTP (File Transfer Protocal) is used for downloading or uploading files to your computer, and, well, a File will open that file on your computer.
Phew! That was a lot! Well done. 🙂


Second Blog: Effort Pays!

Hello there everybody, I don’t blog very often. (often I am far too busy, with my children and other normal life events that occur, or I am STUDYING.!)

The last post was right at the beginning of my learning.. I made pages from scratch using HTML and CSS only… I don’t know how bad or good they were as I cannot judge my own work.

These pictures here were taken about a month or so ago, things have changed since but it still needs a lot of work and changing.

13490717_1149688741749226_604047784298658718_o

13442451_1149689021749198_3906289501961929248_o

onej

My point of creating this website was to prove to myself that I knew what I had learned and could teach other people in return: (I know, I read the HTML5 and CSS3 For Dummies is very difficult…) My website was designed to be very easy and I also enjoyed interacting with the people with my own personality.

The programming languages I know now are still HTML5, CSS3 and JavaScript.  PHP is to come soon… This website is based on learning HTML5 and it has a bit of CSS3 in it.

(Includes teaching a bit of XML, XHTML, HTML and CSS.)


Anyway, as my latest update:

I am in the of  making an art website which includes all artists and all types of arts, also authors and musicians with the idea that they can then have their art shown and be able to become known in Luxembourg.

That’s all for today, thanks for reading!

A.

Lessons Two – (3)

Differences…

What is the difference between a website and a web application, or the internet and the world wide web or front end developers and back end developers and what on earth is a full stack developer?

The internet is a network… One network connects to other networks which makes the world wide web available. The internet is connected to a network. Your home computers and phones and laptops and work computers are all connected to networks.

The World Wide Web means things that you can connect up to on your computer or phone, the world wide web creates web applications like Facebook and Twitter and E-mails and Wikipedia…

Whereas the world wide web is created by a lot of programming languages and code, networks are more technology and hardware , machines.

Here is an interesting fact:

A man named Tim Berners-Less (A British computer scientist)is widely known as the creator of the World Wide Web. In the olympics 2012 he was honored with an opening segment called “Frankie and June say thanks to Tim”. It is said that during this dance, some teenagers came to praise Tim for the WWW, to which he replied: “It is for everyone”.


Websites and web applications… Again it is similar that in general people will always just say “a website”. But there is a difference, although very small, you might have to ask yourself many questions to work out if you are running a website or a web application.

Web applications are actually the most familiar! A web application is something which is constantly updating (like Facebook or Twitter) and applications that interact with a user (like questionnaires or games..)

But a website is much more static. It barely needs updating very often at all… Think of a marketing page selling the same thing and that page never changes…Or a google like that goes to a scanned document. That wont change. These websites do not interact with a user like clicking buttons or selecting answers or playing videos, etc, etc.

Obviously, none of this information means you have to go around trying to say “I’ve got the world wide web now!” instead of “I have internet now!” or whatever, it just does sound a bit nerdy and dumb, it’s like saying This is a 1p and this is a 1 cent, but the mathematical difference is…” So keep talking how you do, it’s fine, you just learnt something new.


Anyway last of all I wanted to tell you about front end developers and back end developers.. That’s a little more complicated.

Front end websites are the ones that you can look at the beautiful style and headings and photos and you can interact with it and click buttons or use a dropdown menu. Front end developers use a lot of HTML and CSS in this.

Back end websites are the coding and the database of a web page that even allows it to exist. While front end you can fill in a form page, it is the back end that stores and keeps this information to remember it and validate it. The back end has to be working for any application to work… Back end also runs calculations and database interactions and performance.

While front end developers have to learn things such as HTML, HTML5, CSS and CSS3, JavaScript, Photoshop is great and PHP is useful and other programs to start off with, a back end developer will be more interested to learn things like PHP, Python, Ruby, SQL, MySol and many others…

There are also Full Stack Developers. A full Stack developer will know pretty much every coding languages and coding, they know both front end and back end. Full Stack Developers are knowledgeable in setting up and configuring Linux server, or writing server-side API’s, being able to immediately identify a client-server-side, and a pro to taking the responsibility of taking a solution/articles and finding the pro’s and con’s.

(Yes, I agree that anybody near being able to do any of this or all is actually Superman himself, or Superwoman.)


Oh! I must not forget. Please try to figure out if you are wanting to learn wed design or web development. Sometimes the lines between them get blurred, a web designer learns WordPress and Photshop and many other web design programs. A web designer can take a client and make up a design for their website, but then the pages are all handed over to a web developer who knows all the coding to bring that design and bring the website to life.

It’s a good idea to learn HTML5, CSS3, JavaScript and PHP anyway no matter which path you are taking. This is because, if you are creating your own website from scratch you will need things like CSS3 for certain designs… and HTML and WordPress bother use HTML and JavaScript in their coding all the time. (So you can mess around with WordPress.)

– More about this on my blog 2. All for now. Lesson number 3 will be about URL’s, yay! Learn well, A.

Lessons Two – (1)

The History Of…


Well done for completing lessons 1 basics! Of course you want and need to learn more, but hold your horses for a sec.

Everything in Lessons’s two will be more like facts, the history, information on, etc. For some of you this might be fun and interesting, but for everyone it is actually very useful to know these subjects.

So lets dive into the history oh HTML first.


HTML stands for Hyper Text Markup Language.


  • Tim Berners-Lee invented www. in 1986, then Tim Berners-Less invented HTML in 1991
  • In 1993 Dave Raggett drafted HTML+, and the HTML Working Group defined HTML 2.0 in 1995…
  • The W3C (World Wide Web Consortium) recommended HTML 3.2 in 1997, they recommended XHTML 4.01 in 1999.
  • Then whatwg (Web Hypertext Application Technology Working Group) came up with the first public draft of HTML5 in 2008 and the HTML5 Living Standard in 2012.
  • W3C came back with the final recommendation of HTML5 in 2014.

(So the last update was on the 28th August 2014.)

These are continuously being updated in time…


As an interesting fact,  obviously Tim Berners-Lee (who was a British computer scientist) is considered the inventor of the World Wide Web. Tim Berners-Less was honored at the 2012 Olympics where they played their first part “Frankie and June Say Thanks To Tim!” It is said that a lot of teenagers praised him for the World Wide Web during this dance, where he said, “it is for everyone”.

 All for now, try to remember as much as you can – Next we will be learning a bit about XHTML.


HTML(5) – Lessons Two (2)

HTML and XHTML

I assume that you might have heard about XHTML and perhaps XML.

Well, actually XML comes before XHTML – It stands for Extensible Markup Language. It’s a set of encoding rules for specific documents electronically. But Actually XML emphasizes how simple coding is and is used for general use all over the web for people. It’s data format is Unicode, so almost every programming language understands it.

XHTML is basically an attachment to XML. (like saying it is an XML application..)

XHTML stands for Extensible Hyper Text Markup Language. It’s a good idea to learn XHTML at some point in your studying, should it ever come up, but focus on things like HTML5, CSS3, JavaScript, PHP, Java, Ruby, Python, Ajax… you get the idea, I could go on.

You have already learnt some HTML as well as HTML5. XHTML and HTML are very similar but XHTML is a lot stricter.

– The DOCTYPE is mandatory. This has to be the first thing at the top of the page.
<!DOCTYPE html PUBLIC”-//W3C//DTD XHTML 1.0 Transitional//EN””(URL) dtd”>
is a common example of what XHTML might accept…

The xmins attribute is also absolutely needed in XHTML. This can go below the doctype but above the head. <html xmins=(document/page URL or a language like en/US) and other information can be put into xmins – Basically it just stops the page from getting confused with other pages.

(This is invalid in HTML 4.01, and optional in HTML5.)

<html>, <head>, <body> and <title> are all also absolutely needed in XHTML.

XHTML elements MUST be properly nested, always be closed, must be lowercase and only have one root element. Attribute names must also be lower case, values must be quoted and oh yeah, minimization is forbidden…

So if you have a HTML page and you would like to convert it to an XHTML page, just for a tester to see what it would be like (learn  a little)

1. Add an XHTML !DOCTYPE to the top of every page you are creating.

2. Add the xmlns attribute to the HTML element at the top of each page..

3. Make sure to change all your element names to lowercase.

4. Close all empty elements.

5. Change all the attribute names to lowercase also, and last of all: Quote all of your attribute values.

…See the difference? In a way it does make sense because it does look a lot neater and for some people easier to read, but in the end XHTML was updated to better and better programs which worked a lot better – We are now onto HTML5… Some things still stick though: For instance, it’s a good idea to write all your tags and attributes and elements in lower case letters. It is a lot easier to type and looks a lot neater!!

Now HTML5 is of course better than HTML4 because it has all the updated and used tags/attributes/elements, which the programs before did not have. This is making the coding being able to create better and better webpages in easier ways.


For your information: !DOCTYPE Versions.

<!DOCTYPE html> HTML5

<!DOCTYPE> All Browsers

<!DOCTYPE HTML PUBLIC” Up to Windows 4

<!DOCTYPE html PUBLIC”-//W3C//DTD XHTML 1.0 Transitional//EN””(URL).dtd”>

XHTML 1.0

Create a free website or blog at WordPress.com.

Up ↑